JOURNAL
documenting
&
discovering joyful things
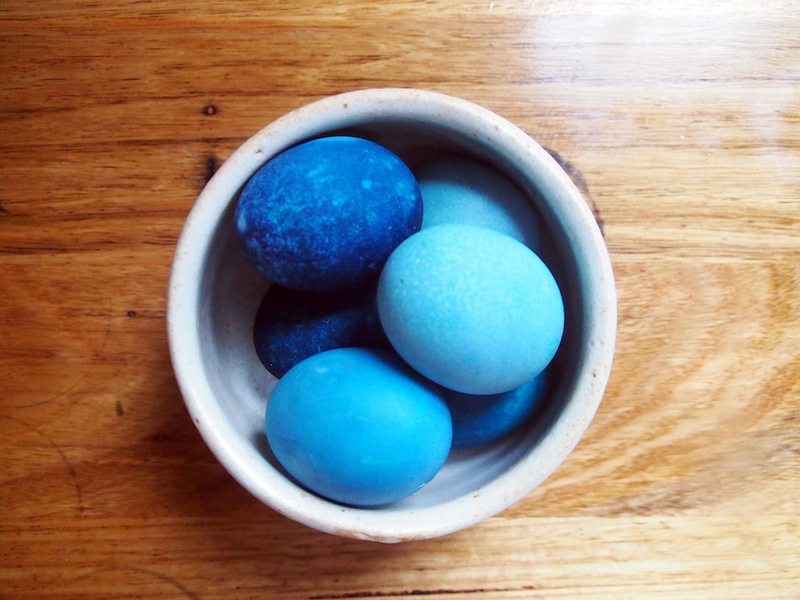
Make this, naturally: blue & botanical Easter Eggs
OLYMPUS DIGITAL CAMERA

OLYMPUS DIGITAL CAMERA
OLYMPUS DIGITAL CAMERA
OLYMPUS DIGITAL CAMERA
OLYMPUS DIGITAL CAMERA
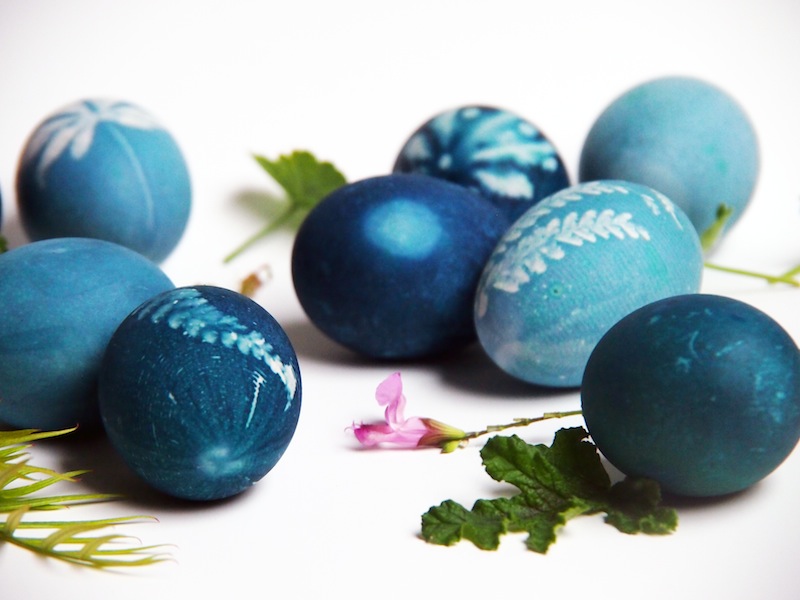
Here's a lovely, last-minute tutorial for dying Easter eggs a stunning blue, and creating pretty, stencilled patterns out of leaves and flowers. Do you want to give it a go? There's still time!
The idea for this project came from my friend Pascale, who does it every year with her children. When they were little, she said, they would gasp with wonder at the patterns created on the eggs. Even now, as almost-grown-up teenagers, they still ask to make these decorative eggs every Easter, hunting through the garden for the "perfect" flower or leaf to create their stencil.
Pascale told me she would use egg dye to create a rainbow array of stenciled eggs, but I couldn't find any in our local shops and from past experience I hadn't had a lot of luck using food dyes. Instead, I found a tutorial for making a brilliant blue dye out of red cabbage, and it turned out to be incredibly easy.
What you'll need:
* Hard-boiled eggs * 1/2 red cabbage * White vinegar * Table salt * An old pair of pantyhose
This project works best on white eggs. If you can't find any, here is a super easy tutorial for whitening eggs, using only white vinegar. If you're going to do this (I did and it worked really well), make sure you hard-boil the eggs before whitening them - it will make them a lot less delicate when you come to rub the colour off.
Step 1: Make your dye
1. Roughly chop up half a red cabbage into pieces about the size of your fist. Toss them into a large saucepan, then pour in two litres of water, and bring it to the boil. Reduce to a simmer, and let it bubble away for half an hour.
2. Strain the now-purple water into a heat-proof bowl, and discard the cabbage. To the water, add four tablespoons of salt and four tablespoons of white vinegar, then stir it around until the salt dissolves.
Step 2: Prepare your eggs
1. While you're making your dye, hard-boil your eggs (and whiten them as per above, if needed)
2. Take a walk around your garden, or along your street. Look for small leaves and flowers in pretty patterns that catch your eye, and gather a little collection to take back inside
3. Cut off pieces of the old pantyhose, about 10 centimetres long each. Tie a knot in one end.
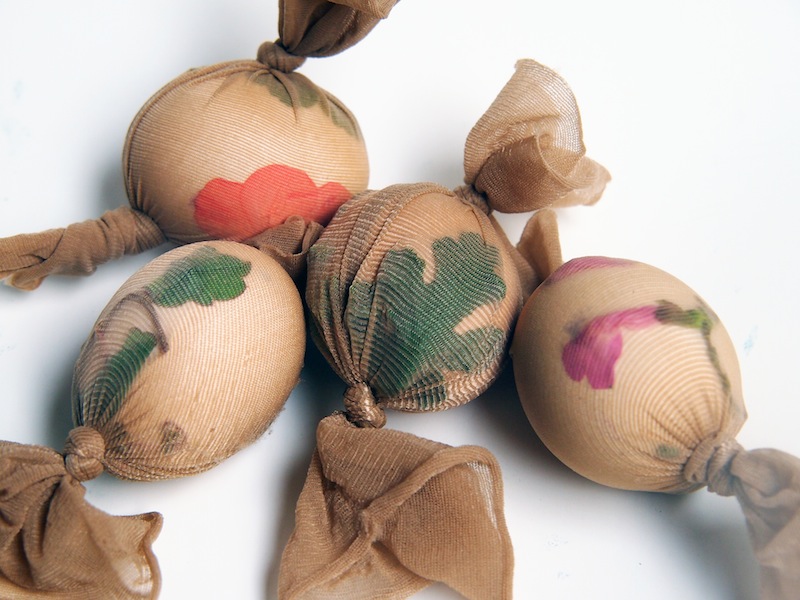
4. Now take one of your leaves or flowers and press them against one of the eggs. Put the egg and plant into the piece of pantyhose, and pull it tight before tying a knot at the other end (see below). Repeat this step for as many stenciled eggs as you hope to make
OLYMPUS DIGITAL CAMERA
Step 3: Wait for the magic to happen
1. Gently submerge your pantyhose-egg in the bowl of dye. You might want to mix things up by submerging some non-stenciled eggs, too, so you have a variety of plain and patterned eggs when you're done
(Pro tip: if your eggs are bit old and you find they're floating, pour the dye into a taller, more narrow vessel - I used a large vase - then once the eggs are all in the dye, lower a piece of cloth over the top. I used a Chux wipe. As the cloth soaks up the dye, it submerges, pushing the eggs down with it without marking or scratching them the way a more solid weight would do)
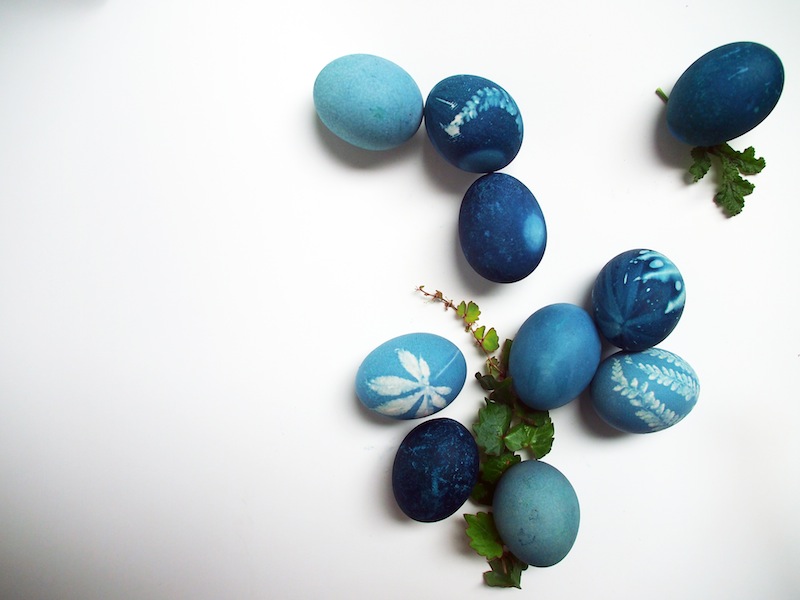
2. Leave the eggs in the dye for as long as you like. About an hour will give you a lovely, pale, blue. Several hours or overnight will turn them indigo
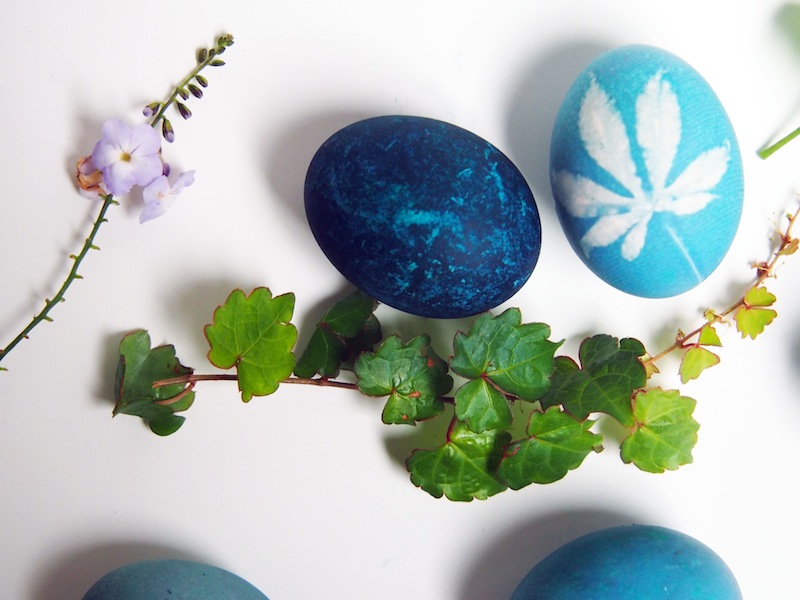
3. When you take the eggs out, gently cut them out of the pantyhose, and lift away the plant. It should reveal a beautiful, stenciled pattern
4. Place the eggs on a wire cake-rack to dry completely, before using them for your Easter decorations
Two final words of advice:
1. After about 24 hours, the dyed eggs turn from blue to more of a turquoise or aqua. They're still beautiful, but bear this in mind if you're being all strategic with your colour scheme
2. Ideally you'll want to do this project on a warm day with the windows open: our house really stank of cabbage!
Happy Easter dear friends, if this is something you celebrate. What are your plans? We're off to visit family in Bendigo, then helping to host an Easter egg hunt in our local park, followed by a roast lunch for 13 friends in our home, and then a day off on Monday to recover. See you on Tuesday!
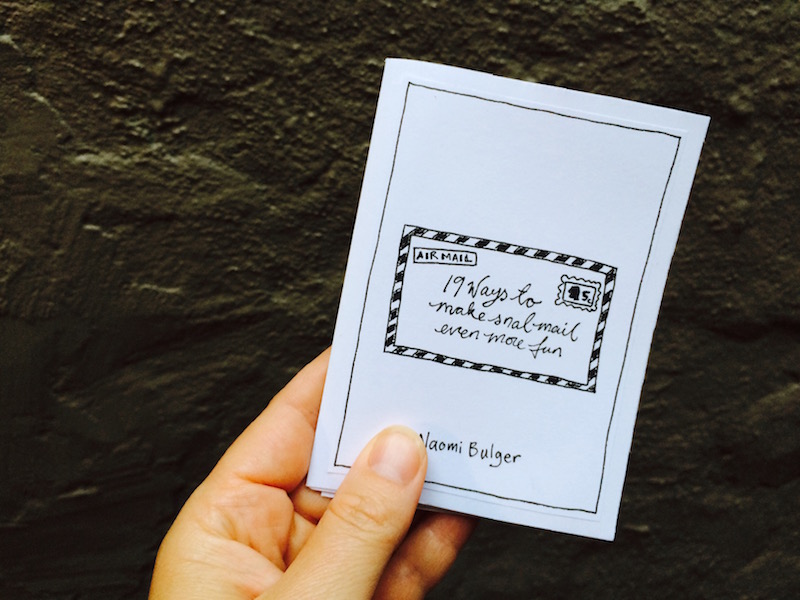
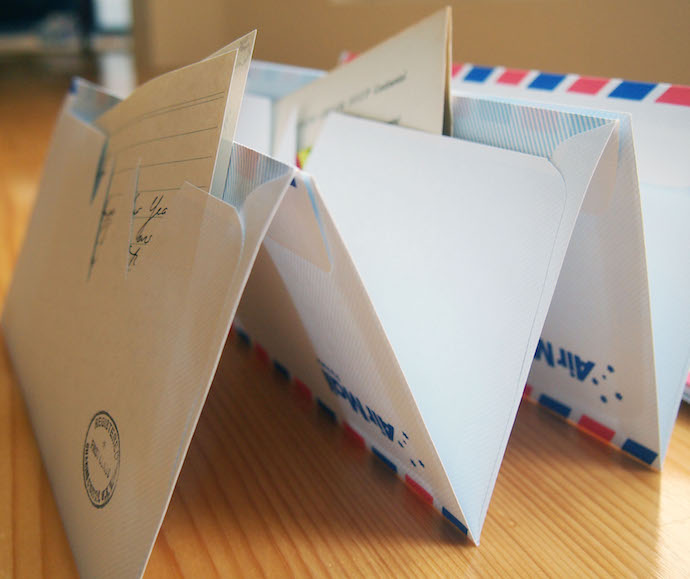
19 ways to make snail-mail (even more) fun


A little while ago I mentioned I was making a zine about things you can do with snail mail. Things that help you connect with other people (both strangers and friends), to play games, practice creativity, and show you care. Every page has a call-to-action, like a website you can visit or key words to Google or an address to write to.
I made 11 copies of the zine, and sent them off to some lovely blog readers. I wanted to make more, I truly did, but I don't have a double-sided printer and I just couldn't get the fronts and the backs to line up (do you know what I mean?), so I had to cut and paste all the individual pages and each zine literally took me HOURS to make.
In for a penny in for a pound, so I also hand-made some little envelope homes for the zines, out of last year's old calendar (it was SUCH a beautiful calendar - I wish I had one like it this year!). I finished the whole thing off with a wax seal, as you do.
If you'd like your own copy of this zine and can help me figure out the photocopying conundrum, let me know. Or maybe I should make it available as an e-book? What do you think? Would you like that? In the meantime, I made this little movie so you can see what's inside.
Yours truly, Naomi xo
Happy things

This little project, a tiny zine. I’m writing a book about snail mail and, while I’m at it, I thought I’d make this as a kind of a sneak peek to help get people excited about the post and open their eyes to what’s out there for them.
The lemon tree is fruiting again. I like to run my hands along the branches when I walk past and then cup them to my nose, breathing deeply of the perfect combination of blossoms and zest. Last autumn, we were swimming in lemons. Get your orders in now, folks, if you’d like some.
Yesterday afternoon a storm rolled around and around for a couple of hours and the rain-drops were fat and full and fresh. Then the wind picked up and, finally, the seemingly-interminable heat washed away into the storm-water drains, and the world began to feel alive again.
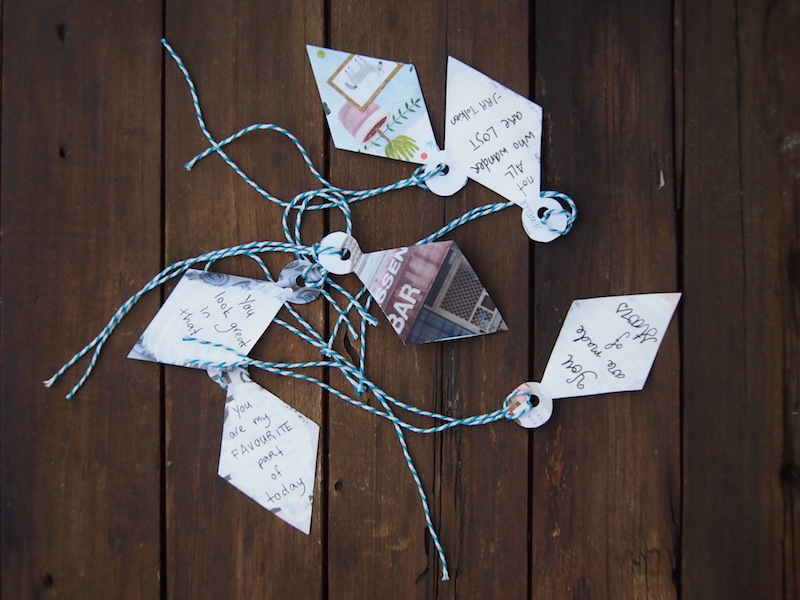
Valentines for strangers


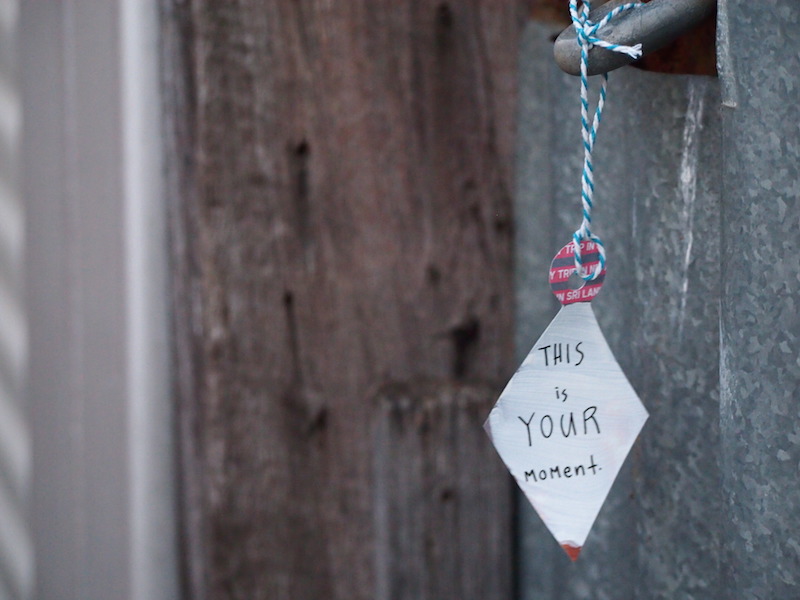
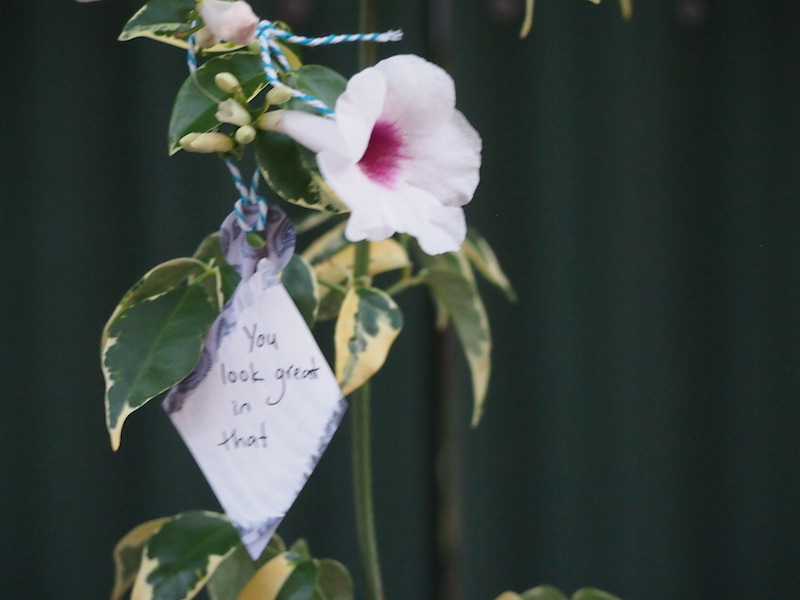
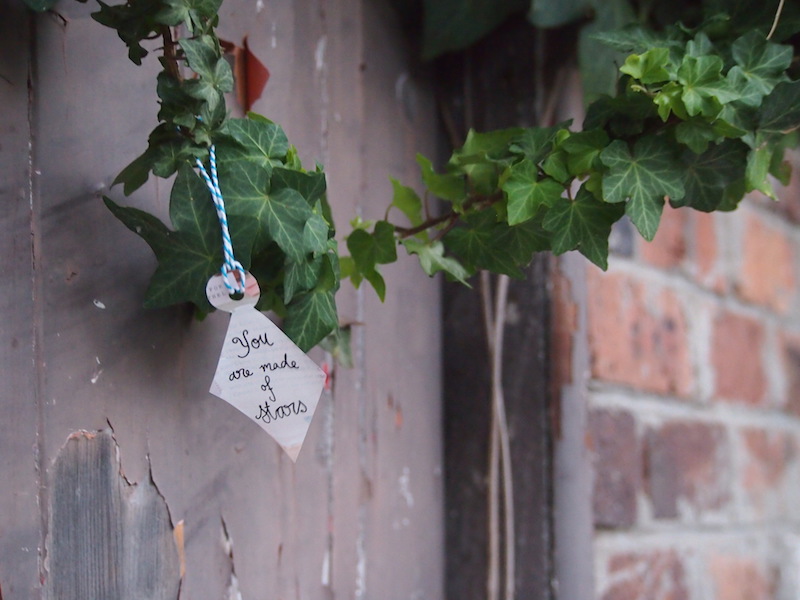

Under the cover of almost-darkness, the dog and I went for a walk down one of Melbourne’s many laneways last night and left behind some little inspirational love-notes for strangers. Because maybe just maybe, the RIGHT words will be seen by the RIGHT person, just when they need them the most. The neighbour’s cat was less than impressed.

Make this - snail mail concertina pockets
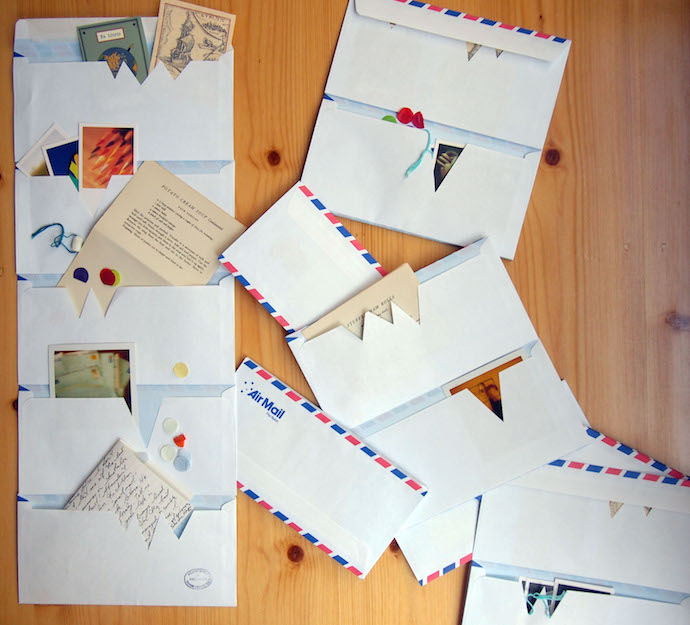
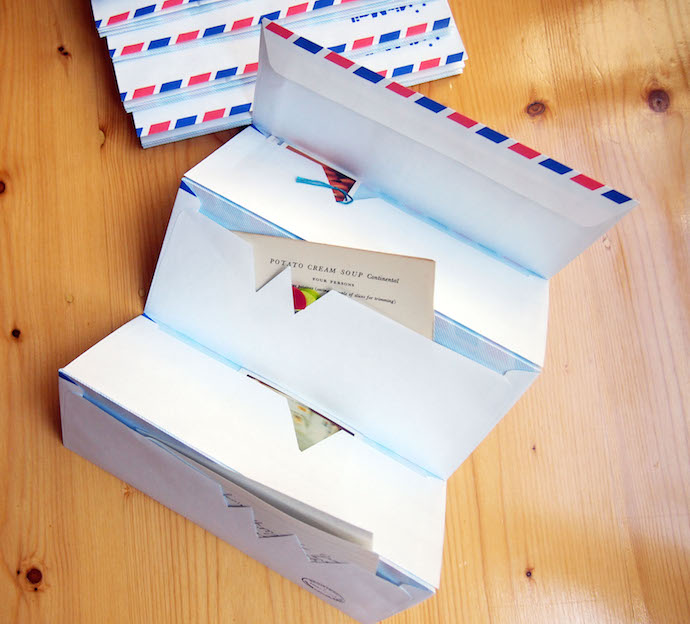
This is a really simple way to create a little concertina of pockets in which to place gifts for pen pals. To make them, you just attach the top of one envelope to the base of another, to create a kind of concertina filled with snail-mail surprises. I first saw it on Pinterest and I THINK the link originally came from Martha Stewart, but I couldn’t find the source when I went looking. Cute, huh?
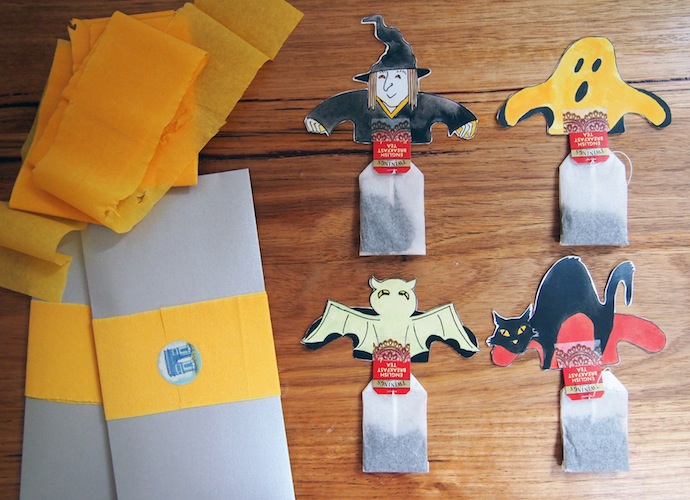
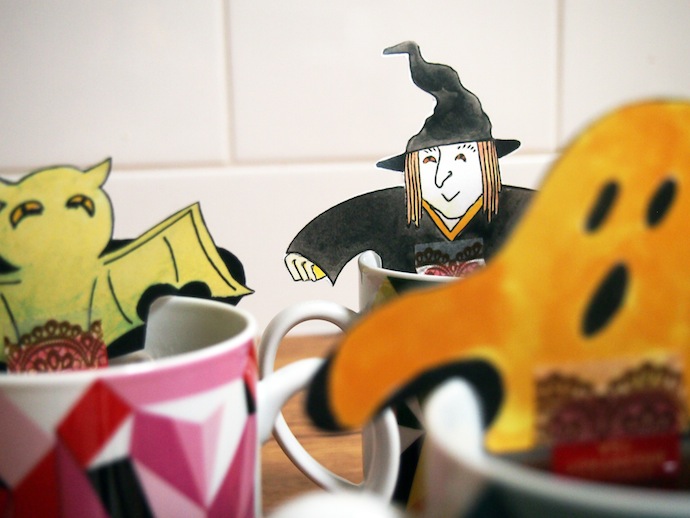
Handmade Halloween tea-treats


On the spectrum from trick to treat, I'm hoping these friendly little handmade Halloween tea-spooks definitely fall on the treat side. Next year, maybe I'll get my act together and pair them with some skeleton gingerbread men. Or gingerbread cats. Or something. This year, I packaged them up with yellow craft paper and posted them off to these lovely blog readers.
If you need a last minute, slightly-more-grown-up treat to give to friends, a set of these little guys will take you about five minutes to make.
1. Download the template 2. Print or photocopy it onto thick paper or cardstock 3. Cut out each friend, then attach them to teabags with staples or tape
If you have a bit more time, get fancy with some lovely herbal blends, or even create a teabag of your own with a little ball of loose-leaf tea in a square of muslin, secured with string.
The friendly spooks will reach their arms around the edges of your tea cup while the tea steeps.
Happy Halloween friends!

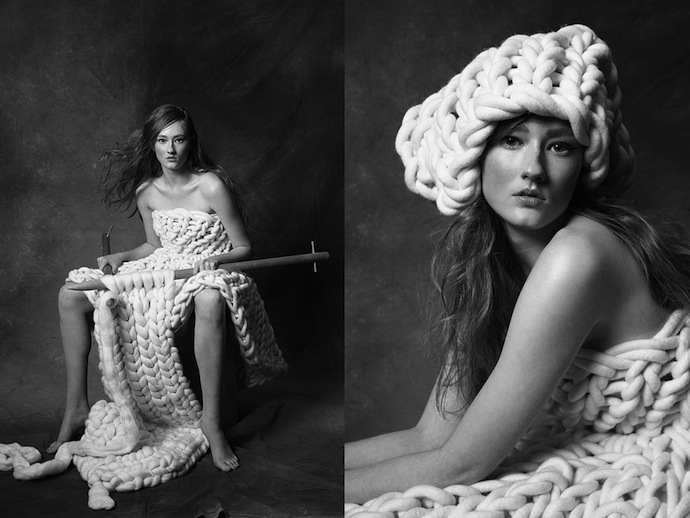
Textile artist Jacqueline Fink on the creative process
 "My work is as much a physical feat of endurance as much as it is a loving creative respite." ~ Jacqueline Fink


Jacqueline Fink is a knitter, and some. She is also a crafter, a dreamer, and an artist. And a mother.
Jacqueline learned to knit, like so many others, from her own mother. She told Trend Tablet magazine that as a child, she was "too impatient to commit to the language of knitting" to be able to follow a pattern. But five years ago, after her mother received a double lung transplant that saved her life, Jacqueline had a dream that heralded the beginning of her creative brand, Little Dandelion.
Now, she creates large-scale knitted works that range from gorgeous, textural blankets to chair covers and enormous 'pure art' installations.


From time to time, as a creative person, I struggle to find inspiration. I also struggle to manage my work-life balance. And I feel overwhelmed, stifled even, by burnout and writer's block (that's been happening lately).
But somehow in my mind I put creative professionals - "real artists" as opposed to hobby creatives like me - up on a pedestal when it comes to the creative process. Subconsciously, I imagine this is all seamless for them. Which is untrue, and probably rather unfair of me. Professional artists, designers, crafters, writers and every manner of other creative folks have to find inspiration, balance priorities and beat burnout, too. Duh. Of course.
So... I figured we might all be able to learn a little something from how other artists approach these challenges, and Jacqueline was kind enough to share a little from her own experience.
ON SEARCHING FOR INSPIRATION...
My process is perhaps a little unusual. I don’t draw on external references for inspiration: I’m not one to trawl through magazines or the internet and while the natural world may influence my preference for a natural colour palette I create purely to please myself.
Inspiration typically finds me via a subconscious thought stream when I am engaged in something completely unconnected with my work or via a dream. I see the creation in my mind’s eye and, because I cannot draw, then have to hold it there while I work out a way to make the piece.
ON OVERCOMING CREATIVE BLOCK…
I have learned to do the following:
1. Just park the problem in the too hard basket and do something completely unconnected with your craft for a while 2. Spend time in the company of elbow creatives whom I love and admire. Their energy always reinvigorates me propels me on 3. Keep creating. I’ve often overcome great difficulties with one project through the process of making another
ON WORK-LIFE BALANCE…
I gave up on trying to achieve a work/life balance long ago and I don’t beat myself up about it. It is what it is. I work in our living room and so there is no separation of space for any of us and our life is pretty much chaotic most of the time. But we are a very flexible bunch and can tolerate mess so we just do the best we can with what we’ve got. When you have something you want to achieve it is very important that you don’t place roadblocks in your path as an excuse not to give it everything you’ve got.
And one last (exciting) thing…
Jacqueline is now developing her own oversized knitting yarn "so that others can experience the joy of slow craft and this rather unusual method of knitting." Hooray! If you want to stay tuned, or take a look at more of her lovely work, Jacqueline's website is at LittleDandelion.com, and you can follow her on Instagram at http://instagram.com/jacquifink.
All images here are used with Jacqueline's kind permission, and taken from the Little Dandelion website. Photography credits are as follows (top to bottom): 1. Sharyn Cairns 2. Jacqueline Fink 3. Jacqueline Fink 4. Jacqueline Fink 5. Sharyn Cairns 6. Jacqueline Fink 7. Jacqueline Fink 8. Jacqueline Fink 9. Paul Westlake
Hello and links on Monday


Scenes from my house.
How was your weekend? Mine was pretty simple. I worked most of Saturday, while Mr B played with the kids. They did painting and went to the park and baked chocolate pudding and generally had a great time letting nutrition and nap times go to seed. I got my hair done too, back to blonde baby! We went for a walk through Carlton in the stunning winter sunshine, linking one park to the next for Madeleine's sake. We ate yum cha. We ate a nine-piece (!!) tea-infused dessert plate from Travelling Samovar to celebrate their first birthday. (We skipped dinner that night.) I tidied and sorted my office and finally cleared all my mess off the dining table (making room for these lovely flowers) and it felt SO good. I painted some more snail mail to send to you.
Here are 11 things that might make you happy today.
This drink sounds like heaven
Pattern on pattern. So cheerful
Beautiful!! This cloud lamp simulates a storm and plays your music (via Swiss Miss)
The world's first bike-share for kids (in Paris, of course)
Love these printable moving/housewarming announcement cards
The science behind old book smell
Exclamation points are the new smiley-faces
I really wish I'd been at this feast for 1200, at one long table stretched over a bridge
Have a great Monday!
13 ways to reignite your creative mojo
 The journey of the days and weeks deep and then deeper again into the winter season feels like a deliberate grinding down. A forcible slowing, as primal as hibernation. It starts on the first morning you realise you're getting up in the dark, and that night blankets the streets outside before the kitchen fires up for dinner. It gains momentum when the garden turns sparse and soil shows, black and hard, under the fallen leaves. When you pull your knitted hats and gloves and scarves out of storage. When your words float in visible clouds around your face as you leave the house in the morning.
Winter is a lesson in slowing down. In taking stock, in being more aware of the present. And I don't know about you but when I finally dial things back a bit, that's when the creative ideas tend to appear. It's as though my creative mojo is shy, waiting until most of the crowd in my mind has gone home and bunkered down where it's warm. Then, in the cold quiet of a winter's morning, ideas tip-toe back in.
So if your ideas have been shy of late too, or if they're just not being heard over all the stuff you've got going on, here are 13 ways to use the winter downtime to reignite your creative mojo.
Tend to your word garden. Or perhaps visiting a word gallery is more your speed, or sitting down to a word craft-table, or sweating it out at a word gym. It doesn't matter. The lesson is to do that thing that teaches your mind to unwind, relax, and let creativity grow. Failing that, just read this piece about "the word garden" anyway. It is beautiful
Notice the good. This tip for parents to "catch them doing the right thing" is actually a wonderful reminder for everyone. Try to look for the good in people, actively notice their better selves
Search for pockets of light. You might just find beauty
Solve an urban mystery. Like this cute story about "the dudes"
Be in the present. This beautiful neon clock, called ThePresent, completes just one revolution in 365 days. It inspires thoughts like this: "It's a reminder to stop everyday. It helps me find some grounding or a moment of reflection, a good thought, a deep breath..."
Unleash your creative soul, by signing up for one of these workshops
Make stuff out of cardboard. It doesn't have to be this fancy (but it could be)
Put down that phone. Step awayyyyy from the computer
And related to the above, start "single-tasking." This video is so funny, but true
Steal time for you. Whether you can grab five minutes or several hours, make the most of "me time"
Let others help you overcome your creative block. Danielle Krysa of The Jealous Curator has just published a book called "Creative Block" in which 50 international artists share their insights and exercises on how to get new ideas flowing
Show your joy. Don't be cool, celebrate it like a toddler
Write a love letter to a stranger
How about you? Do you have any tips for reigniting that creative spark?
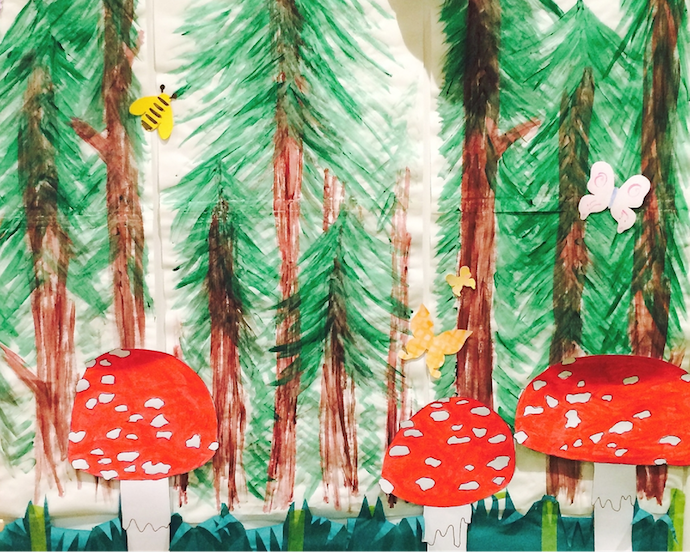
How to create a winter woodland picnic party
 When I carried Madeleine into her playroom at 6.30 on the morning of her second birthday party she breathed "The park!" in wide-eyed wonder. I put her little sock-feet down on the grass where she was used to feeling floor-boards and she slowly spun around, taking in my dodgily-drawn toadstools, wonky painted fir trees and floppy crepe-paper grass. "Wowwww. The park!" she whispered. And just like that I felt like Picasso.
Winter in Melbourne means Madeleine will probably always have her birthday parties indoors. But she loves - she really loves - the park. So we created the a picnic-in-the-park party for her in our home. It wasn't that difficult, or that expensive, and I imagine you could make this bringing-the-outside-in scheme work for all kinds of woodsy party themes, like a teddy-bears' picnic, a fairy kingdom, or a woodland creatures party.
1. On a budget

Most of our decorations were home-made for just the cost of cardboard, paint and some masking tape; or found around the house:
* A back-drop of fir-trees painted onto butchers' paper
* A green trim of crepe-paper grass around the skirting boards
* Red and white toadstools painted onto cardboard and stuck around the room
* Cardboard cut-outs of bees, butterflies and ladybirds, also stuck around the room
* Blue and white cardboard clouds, strung from door frames and other high places
* Red and white polka dot paper cups and plates
* Red and white paper bunting, on loan from the lovely lady at Mint Jelly
* Autumn leaves, collected from the park with Madeleine several weeks earlier
* A picnic rug
* Two fibre-glass toadstool stools, on loan from my Mum
2. A little bit more

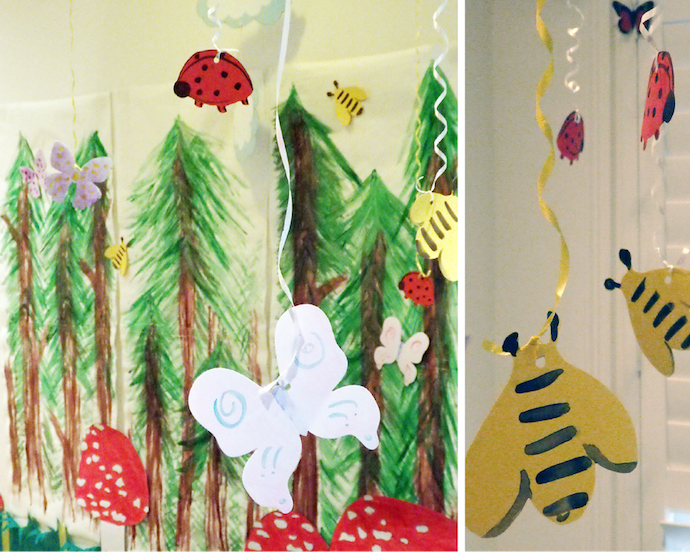
If you can spend just a little more, helium balloons will always be well appreciated by little ones. We (and by we I mean my generous parents who wouldn't let me pay them back) purchased a helium kit from Spotlight. I chose to use only yellow balloons as I wanted to create a "sunny sky" effect and blue would have made the room too dark (that's why the clouds were partly blue instead). I dangled some of the bees, butterflies and ladybirds I had made from the balloons, to make it look as though they were flying around the room. As you can imagine, these were very popular.
3. Your one extravagance


Our one big splurge was three sheets of 1m x 3m synthetic grass, and we went back and forth in the lead-up to the party as to whether or not we would go there. Originally, I thought my idea to use the synthetic grass was genius. I figured that off-cuts would be a super-cheap, easy way to create a "wow factor" in the room (I REALLY wanted to earn that soft "Wow" from Madeleine), and make it a snatch to clean up. I was right about the wow-factor, and the easy clean-up. But this grass is surprisingly expensive. At one point, we were thinking it would be cheaper to just lay real turf in the playroom!
In the end we decided to go ahead and get the grass because we would use it afterwards in our courtyard, to create a bit of a softer, 'garden' area for the children to play until we could afford to pull up the tiles out there and landscape (that could be years).
So there you have it. Madeleine's "winter woodland picnic" themed birthday party. Games were mostly parallel play (because have you ever tried to get a bunch of two-year-olds to do the same thing when you want them to?), with a bit of stop-start dancing and a mini treasure hunt thrown in. Add some cake and chocolate and surprisingly-popular healthy snacks into the mix, and your party is done and dusted, right there.